Quickstart
Before you start diving deep into paquo we strongly recommend to read the excellent QuPath Documentation. Since paquo is just providing a pythonic interface to QuPath functionality very many concepts map directly between the python and java world.
Danger
Paquo is undergoing heavy development. Expect things to change before we reach version 1.0.0
Working with projects
QuPath projects are accessed in paquo via paquo.projects.QuPathProject.
It’s best to use them via their contextmanager interface, because then paquo.projects.QuPathProject.save()
get’s automatically called after you made changes:
from paquo.projects import QuPathProject

qp = QuPathProject('./my_qupath_project/project.qpproj')
...  # science
By default paquo opens projects in readonly mode.
Images on a project are provided via a sequence-like proxy interface (basically a tuple) and they
can be added via the projects paquo.projects.QuPathProject.add_image() method.
>>> from paquo.projects import QuPathProject
>>> from paquo.images import QuPathImageType
>>> qp = QuPathProject('./my_qupath_project', mode='a')  # open project for appending
>>> qp.images  # <- access images via this
ImageEntries(['image_0.svs', 'image_1.svs', 'image_2.svs'])
>>> qp.add_image('/path/to/my/image.svs', image_type=QuPathImageType.OTHER)
When you open an existing project, it might be possible that some of the images in the project
have been moved around. (Maybe you send the project to a friend, and they have the same images on
a network share but the path is of course different.) To check this, projects provide a method
paquo.projects.QuPathProject.is_readable(). It returns image ids (URIs in the current default)
and a boolean indicating if the file can be reached:
>>> from paquo.projects import QuPathProject
>>> qp = QuPathProject('./my_qupath_project', mode='r')
>>> qp.images  # <- access images via this
ImageEntries(['image_0.svs', 'image_1.svs', 'image_2.svs'])
>>> qp.is_readable()
{'file:/share/image_0.svs': True,
 'file:/somewhere_else/image_1.svs': False,
 'file:/share/image_2.svs': True}
With default settings you can reassign missing images via paquo.projects.QuPathProject.update_image_paths()
which takes a uri to uri mapping as an input:
with QuPathProject('./my_qupath_project', mode='r+') as qp:
    qp.update_image_paths(uri2uri={"file:/somewhere_else/image_1.svs": "file:/share/image_1.svs"})
    assert all(qp.is_readable().values())
Danger
There’s a few things to know about this. The way images are passed in paquo uses an abstraction layer
named paquo.images.ImageProvider. It’s default implementation doesn’t do anything smart and
uses image URIs to identify images. (It also only supports ‘file:/’ uris for now.) The idea behind this
is that we can provide a caching layer for gathering images from many different sources. Follow
Paquo Issue #13 for updates.
We will add additional documentation once the implementation details are sorted out.
Projects also serve as a container for classes. They are exposed via another sequence-like proxy:
>>> from paquo.projects import QuPathProject
>>> qp = QuPathProject('./my_qupath_project', mode='r')
>>> qp.path_classes  # <- access classes via this attribute
(QuPathPathClass('myclass_0'), QuPathPathClass('myclass_1'), QuPathPathClass('myclass_2'))
Refer to the class example Predefine classes in a project for more details.
Working with annotations
paquo uses shapely to provide a pythonic
interface to Qupath’s annotations. It’s recommended to make yourself familiar
with shapely. Annotations are accessed on a hierarchy of a QuPathProjectEntry.
You access them through a set-like readonly proxy object. If you want to add additional
annotations use the paquo.hierarchy.QuPathPathObjectHierarchy.add_annotations() method.
>>> qp = QuPathProject('./my_new_project/project.qpproj', mode='r')  # open an existing project
>>> image = qp.images[0]  # get the first image
>>> image.hierarchy.annotations  # annotations are stored in a set like proxy object
QuPathPathAnnotationObjectSet(n=3)
>>> for annotation in image.hierarchy.annotations:
...     print(annotation.name, annotation.path_class, annotation.roi)
...
None QuPathPathClass('myclass_1') POLYGON ((50 50, 50 150, 150 150, 150 50, 50 50))
MyAnnotation QuPathPathClass('myclass_2') POLYGON ((50 650, 50 750, 150 750, 150 650, 50 650))
Another None POLYGON ((650 650, 650 750, 750 750, 750 650, 650 650))
Examples
You can find the code for many use case examples To get started setup a python environment with paquo. Git clone the repository and cd to the examples directory.
user@computer:~$ git clone git@github.com:bayer-science-for-a-better-life/paquo.git
user@computer:~$ cd paquo/examples
user@computer:examples$ python prepare_resources.py
This will create a folder images and a folder projects with example data. These are required for all of the examples to run. Refer to the examples to quickly learn how to solve a certain problem with paquo. In case your specific problem does not have an example yet, feel free to open a new issue in paquo’s issue tracker.
Tip
If you already have a solution for a problem and think it might have value for others (NOTE: it always does!) feel free to fork the paquo repository and create a Pull Request adding the new example.
Reading annotations
To read annotations from an existing project follow the code as shown here:
 1"""example showing how to read annotations from an existing project"""
 2from pathlib import Path
 3from paquo.projects import QuPathProject
 4
 5EXAMPLE_PROJECT = Path(__file__).parent.absolute() / "projects" / "example_01_project"
 6
 7# read the project and raise Exception if it's not there
 8with QuPathProject(EXAMPLE_PROJECT, mode='r') as qp:
 9    print("opened", qp.name)
10    # iterate over the images
11    for image in qp.images:
12        # annotations are accessible via the hierarchy
13        annotations = image.hierarchy.annotations
14
15        print("Image", image.image_name, "has", len(annotations), "annotations.")
16        for annotation in annotations:
17            # annotations are paquo.pathobjects.QuPathPathAnnotationObject instances
18            # their ROIs are accessible as shapely geometries via the .roi property
19            print("> class:", annotation.path_class.name, "roi:", annotation.roi)
20
21    print("done")
Add annotations to a project
To add annotations to a project you simply need to define them as shapely Geometries and then add them to your QuPath project as demonstrated here:
 1"""example showing how to create a project with annotations"""
 2from pathlib import Path
 3from paquo.projects import QuPathProject
 4from paquo.images import QuPathImageType
 5from shapely.geometry import Point, Polygon, LineString
 6
 7EXAMPLE_PROJECT = Path(__file__).parent.absolute() / "projects" / "example_02_project"
 8EXAMPLE_IMAGE = Path(__file__).parent.absolute() / "images" / "image_1.svs"
 9
10ANNOTATIONS = {
11    'Annotation 1': Point(500, 500),
12    'Annotation 2': Polygon.from_bounds(510, 400, 610, 600),
13    'Some Other Name': LineString([[400, 400], [450, 450], [400, 425]])
14}
15
16# create a the new project
17with QuPathProject(EXAMPLE_PROJECT, mode='x') as qp:
18    print("created", qp.name)
19
20    # add a new image:
21    entry = qp.add_image(EXAMPLE_IMAGE, image_type=QuPathImageType.BRIGHTFIELD_H_E)
22
23    for name, roi in ANNOTATIONS.items():
24        # add the annotations without a class set
25        annotation = entry.hierarchy.add_annotation(roi=roi)
26        annotation.name = name
27
28    print(f"done. Please look at {qp.name} in QuPath.")
Predefine classes in a project
Sometimes you might want to create projects with many predefined classes so that different users wont mistype the class names, or that you can enforce a unique coloring scheme accross your projects. Adding classes is as simple as:
 1"""example showing how to create a empty project with classes"""
 2from pathlib import Path
 3from paquo.projects import QuPathProject
 4from paquo.classes import QuPathPathClass
 5
 6EXAMPLE_PROJECT = Path(__file__).parent.absolute() / "projects" / "example_03_project"
 7
 8MY_CLASSES_AND_COLORS = [
 9    ("My Class 1", "#ff0000"),
10    ("Some Other Class", "#0000ff"),
11    ("Nothing*", "#00ff00"),
12]
13
14# create a the new project
15with QuPathProject(EXAMPLE_PROJECT, mode='x') as qp:
16    print("created", qp.name)
17
18    new_classes = []
19    for class_name, class_color in MY_CLASSES_AND_COLORS:
20        new_classes.append(
21            QuPathPathClass(name=class_name, color=class_color)
22        )
23
24    # setting QuPathProject.path_class always replaces all classes
25    qp.path_classes = new_classes
26    print("project classes:")
27    for path_class in qp.path_classes:
28        print(">", f"'{path_class.name}'", path_class.color.to_hex())
29
30    print(f"done. Please look at {qp.name} in QuPath.")
Add image metadata
Especially in bigger projects it can be useful if you know, you annotated a certain image, or what’s the current state of the annotations. For those things it’s best to use metadata like this:
 1"""example showing how to create a project with image metadata"""
 2from pathlib import Path
 3from paquo.projects import QuPathProject
 4from paquo.images import QuPathImageType
 5
 6EXAMPLE_PROJECT = Path(__file__).parent.absolute() / "projects" / "example_04_project"
 7EXAMPLE_IMAGE_DIR = Path(__file__).parent.absolute() / "images"
 8
 9METADATA = {
10    "image_0.svs": {
11        "annotator": "Alice",
12        "status": "finished",
13        "diagnosis": "healthy",
14    },
15    "image_1.svs": {
16        "annotator": "Bob",
17        "status": "started",
18        "diagnosis": "sick",
19    },
20    "image_2.svs": {
21        "annotator": "Chuck",
22        "status": "waiting",
23        "diagnosis": "unknown",
24    },
25}
26
27# create a the new project
28with QuPathProject(EXAMPLE_PROJECT, mode='x') as qp:
29    print("created", qp.name)
30
31    for image_fn, metadata in METADATA.items():
32        entry = qp.add_image(
33            EXAMPLE_IMAGE_DIR / image_fn,
34            image_type=QuPathImageType.BRIGHTFIELD_H_E
35        )
36        # entry.metadata is a dict-like proxy:
37        # > entry.metadata[key] = value
38        # > entry.metadata.update(new_dict)
39        # > etc...
40        entry.metadata = metadata
41
42    print(f"done. Please look at {qp.name} in QuPath. And look at he Project Metadata.")
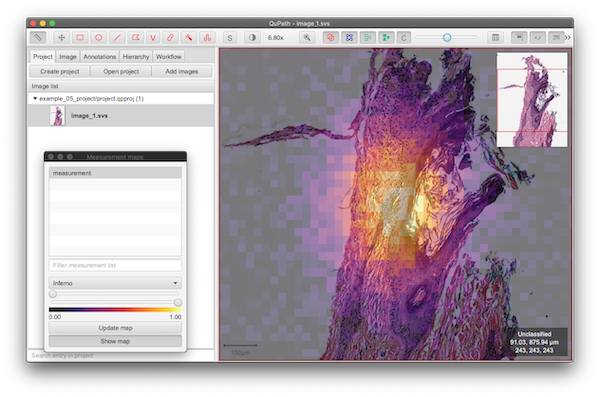
Drawing tiled overlays
If you want to display additional information on top of your image, that can be easily hidden by a user, You can use TileDetectionObjects to build a grid containing measurement values:
 1"""example showing how to draw a tile detection overlay over an image"""
 2import itertools
 3import math
 4import random
 5from pathlib import Path
 6from typing import Tuple, Iterator
 7
 8from shapely.geometry import Polygon
 9
10from paquo.images import QuPathImageType
11from paquo.projects import QuPathProject
12
13EXAMPLE_PROJECT = Path(__file__).parent.absolute() / "projects" / "example_05_project"
14EXAMPLE_IMAGE = Path(__file__).parent.absolute() / "images" / "image_1.svs"
15
16
17def measurement(x, y, w, h, a=8) -> float:
18    """some measurement that you want to display"""
19    v = math.exp(-a * ((2 * x / w - 1) ** 2 + (2 * y / h - 1) ** 2))
20    v += random.uniform(-0.1, 0.1)
21    return min(max(0., v), 1.)
22
23
24def iterate_grid(width, height, grid_size) -> Iterator[Tuple[int, int]]:
25    """return corner x,y coordinates for a grid"""
26    yield from itertools.product(
27        range(0, width, grid_size),
28        range(0, height, grid_size)
29    )
30
31
32with QuPathProject(EXAMPLE_PROJECT, mode='x') as qp:
33    print("created", qp.name)
34    # add an image
35    entry = qp.add_image(
36        EXAMPLE_IMAGE,
37        image_type=QuPathImageType.BRIGHTFIELD_H_E
38    )
39
40    tile_size = 50
41    img_width = entry.width
42    img_height = entry.height
43
44    # iterate over the image in a grid pattern
45    for x0, y0 in iterate_grid(img_width, img_height, grid_size=tile_size):
46        tile = Polygon.from_bounds(x0, y0, x0 + tile_size, y0 + tile_size)
47        # add tiles (tiles are specialized detection objects drawn without border)
48        detection = entry.hierarchy.add_tile(
49            roi=tile,
50            measurements={
51                'measurement': measurement(x0, y0, img_width, img_height)
52            }
53        )
54
55    print("added", len(entry.hierarchy.detections), "tiles")
56    print(f"done. Please look at {qp.name} in QuPath and look at 'Measure > Show Measurement Maps'")
This will allow you to display extra data like this:
Putting Detection Measurements into a Pandas DataFrame
Extracting data from QuPath into Pandas is similarly straightforward:
import pandas as pd
qp = QuPathProject('./my_new_project/project.qpproj', mode='r')  # open an existing project
image = qp.images[0]  # get the first image
detections = image.hierarchy.detections  # detections are stored in a set like proxy object
df = pd.DataFrame(detection.measurements for detection in detections)  # put the measurements dictionary for each detection into a pandas DataFrame
More examples
We need your input! 🙇
Tip
In case you need another example for the specific thing you’d like to do, please feel free to open a new issue on paquo’s issue tracker. We’ll try our best to help you 👍